Complete 10 setup steps with 13 real screenshots
Initial setup defines this AKStream.Next server's identity, database, modules, media service, network, storage, administrator, and HTTPS entry in one flow. Do not click Next by instinct. Reach the visible completion result described in each section before continuing.
Every image below is captured from the current production FirstRunSetupView running in a browser with isolated test data. They are not redrawn mock interfaces and contain no real setup code, password, or secret.
What each of the 10 steps does
| Step | What this page decides | What you should see before continuing |
|---|---|---|
| 1 | Verify the correct server | Setup code accepted, with OS, CPU, memory, and software probes |
| 2 | Cluster, node, and deployment model | Names, stable IDs, and this machine's responsibilities are defined |
| 3 | Business database | Connection test succeeds and an existing-database decision is explicit |
| 4 | Runtime performance | A small, balanced, or high-throughput profile matches real hardware |
| 5 | Feature modules | Only required device protocols, recording, RTC, and related features are enabled |
| 6 | MediaServer and FFmpeg | Executables, configuration, API, and secret are validated |
| 7 | Public address and ports | Client URL, external IP, and SIP/RTP/RTC ports do not conflict |
| 8 | Recording, logs, and administrator | Recording disk is writable, safeguards are sensible, and passwords match |
| 9 | HTTPS and certificate | Nginx/Kestrel entry, certificate source, and final URL are decided |
| 10 | Preflight and final submit | No blockers remain and the firewall list has been reviewed |
Prepare before opening the wizard
| Prepare | Where to get it | Important note |
|---|---|---|
| Local setup code | Installer terminal output or the server .akstream-next-setup-token file |
It is not an admin password; never put it in chat, tickets, or screenshots |
| Database information | MySQL/PostgreSQL/SQL Server administrator or DBA | The account needs database, table, and schema-change privileges |
| Deployment identity | Implementation plan | Decide single-server all-in-one versus separate control/media nodes first |
| Media files | Packaged MediaServer, config.ini, and FFmpeg, or existing server paths |
The server must validate the paths; laptop paths are invalid |
| Network plan | Domain, public/NAT address, firewall, or security group | RTC, SIP, RTP, and TURN use different ports |
| Recording disk | A mounted data-disk directory | Do not use a temporary system-disk directory as a production recording root |
| First administrator | A new username and password owned by the platform operator | Do not reuse the database or device password |
On Linux, the setup code is normally at /etc/akstream-next/Config/.akstream-next-setup-token. On Windows it is normally at %ProgramData%\AKStream.Next\Config\.akstream-next-setup-token. On macOS, use the Config directory printed by the installer. Never include real passwords, secrets, or setup codes in installation screenshots.
Step 1: verify the local setup code
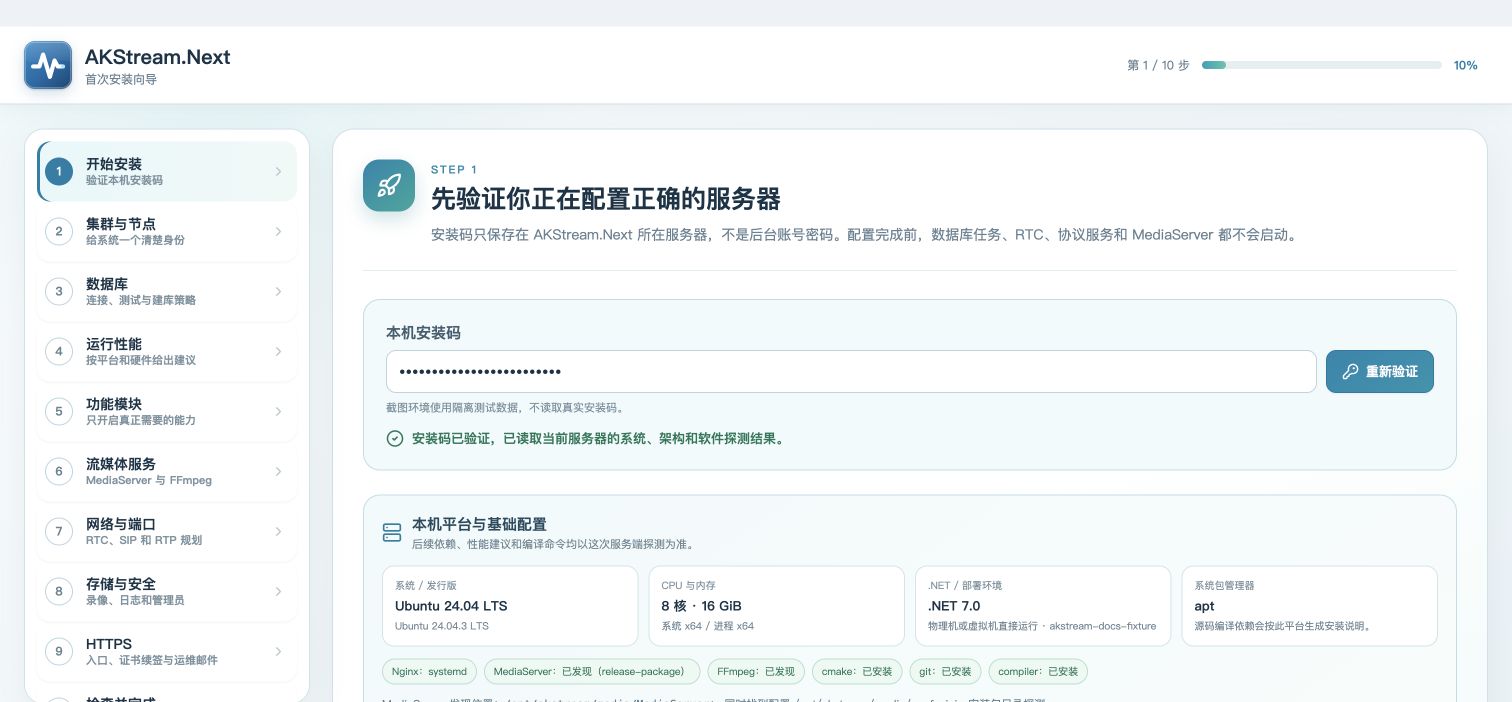
| Reading order | What to do on the page | Correct result |
|---|---|---|
| 1 | Confirm Start installation is active and the header says step 1/10 | No prerequisite has been skipped |
| 2 | Read the code on the AKStream.Next server and paste it | The field has a value, but documentation and screenshots keep it hidden |
| 3 | Select Verify and read probe results | A success message appears with OS, architecture, CPU, memory, Nginx, MediaServer, and FFmpeg probes |
Completion check
A green setup-code success message appears and the detected OS and CPU architecture match the target server. Only then should Save this step and continue become available.
If you cannot continue
- Invalid setup code: read the file from this server; do not use an administrator password.
- Code rotated: read the file again. Draft values entered in later steps are preserved.
- OS or architecture is clearly wrong: stop and check whether the browser points to another server or an old port.
Step 2: set cluster, node, and deployment model
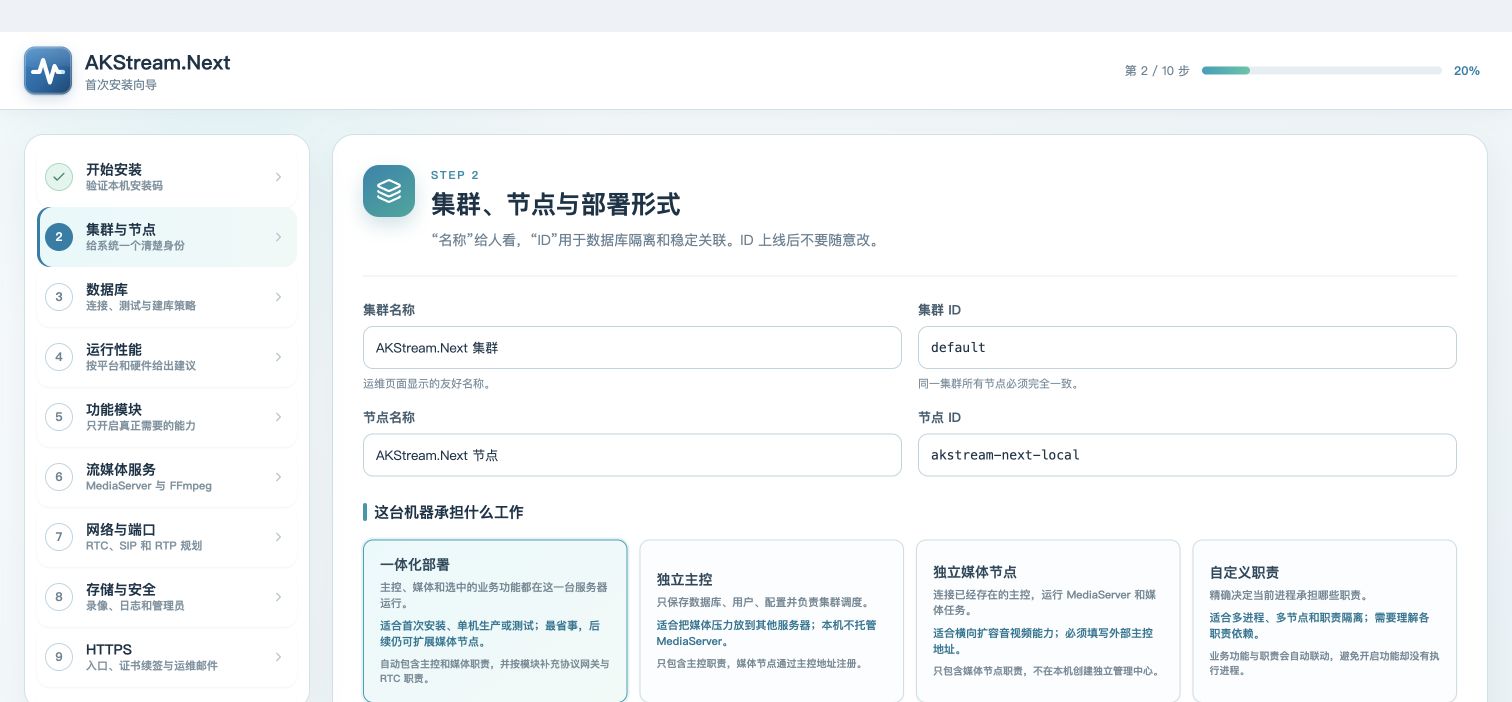
| Reading order | What to enter or choose | Recommendation and meaning |
|---|---|---|
| 1 | Cluster name and cluster ID | The name is for people; every node in one cluster must use the identical ID, such as hz-prod |
| 2 | Node name and node ID | The node ID is stable, such as node-01, and should not be changed after go-live |
| 3 | All-in-one, control-only, media node, or custom | A first single-server installation normally uses All-in-one |
| 4 | Process responsibilities only for Custom | Keep automatic roles unless you understand control, media, protocol gateway, and RTC separation |
Completion check
All four name/ID values are present and the deployment model matches the topology. A media-only node must also contain a reachable external control API URL.
If you cannot continue
- Unsure about ClusterId: check the implementation plan. Do not give each machine in one system a different cluster ID.
- Single-server evaluation: choose All-in-one and do not edit roles manually.
- Future scale-out: start all-in-one and add media nodes later.
Step 3: choose and test the database
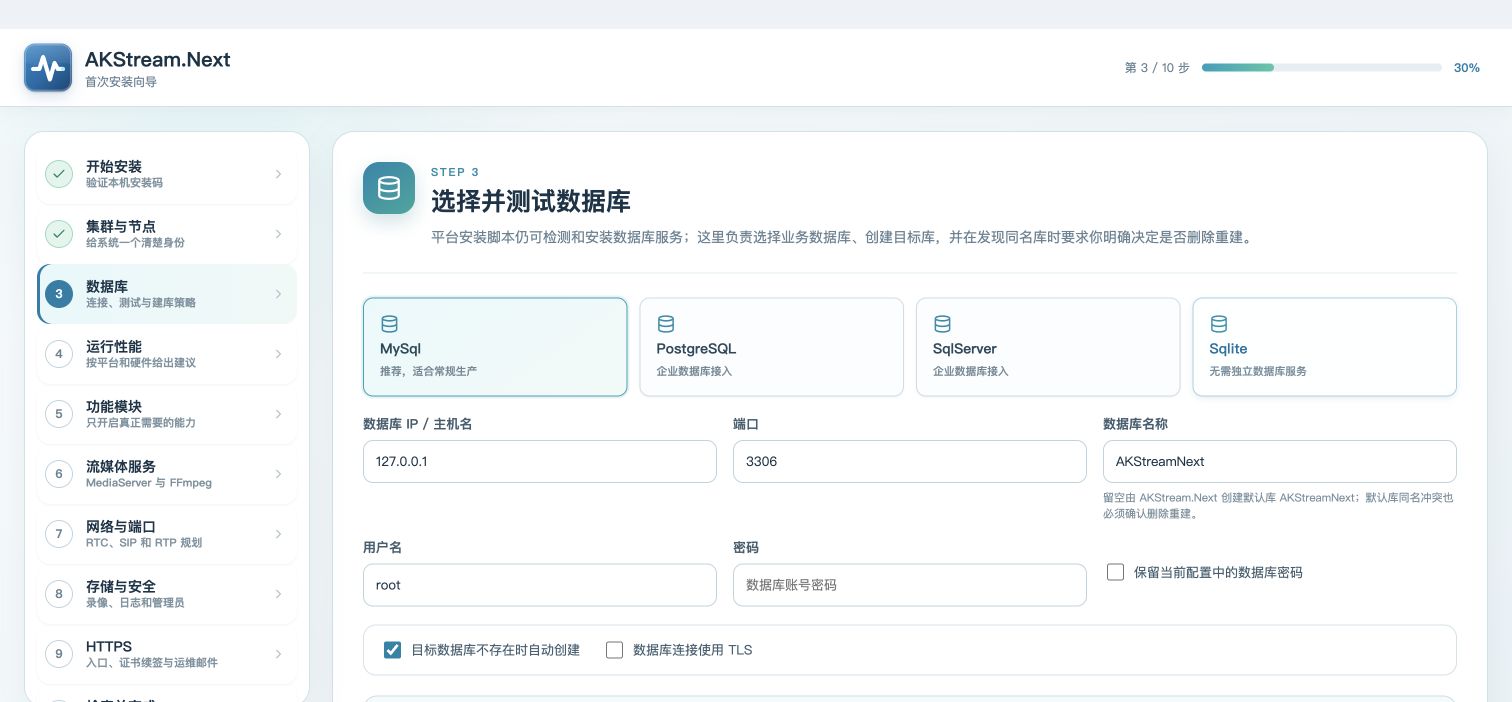
| Reading order | What to enter or choose | Recommendation and meaning |
|---|---|---|
| 1 | MySQL, PostgreSQL, SQL Server, or SQLite | Prefer MySQL for ordinary production; SQLite fits smaller validation environments |
| 2 | Database host, port, and database name | MySQL normally uses 3306; a blank name becomes AKStreamNext |
| 3 | Database username and password | Use a dedicated account; re-enter the password even if the installer prepared MySQL |
| 4 | Select Test database | The full test must succeed; an open TCP port alone is not enough |
Completion check
The page reports a successful database test. If the target is absent, Create if missing is enabled. If an existing database is detected, choose a new name or explicitly confirm deletion and recreation.
If you cannot continue
- Connection refused: test the database IP and port from the AKStream.Next server, not from your laptop.
- Permission denied: the account needs database, table, and schema-change privileges.
- Existing database found: initial setup never silently reuses it. Change the name to preserve it; recreate only after confirming it is disposable.
- Retest after changing any connection field.
Step 4: choose a performance profile for the server
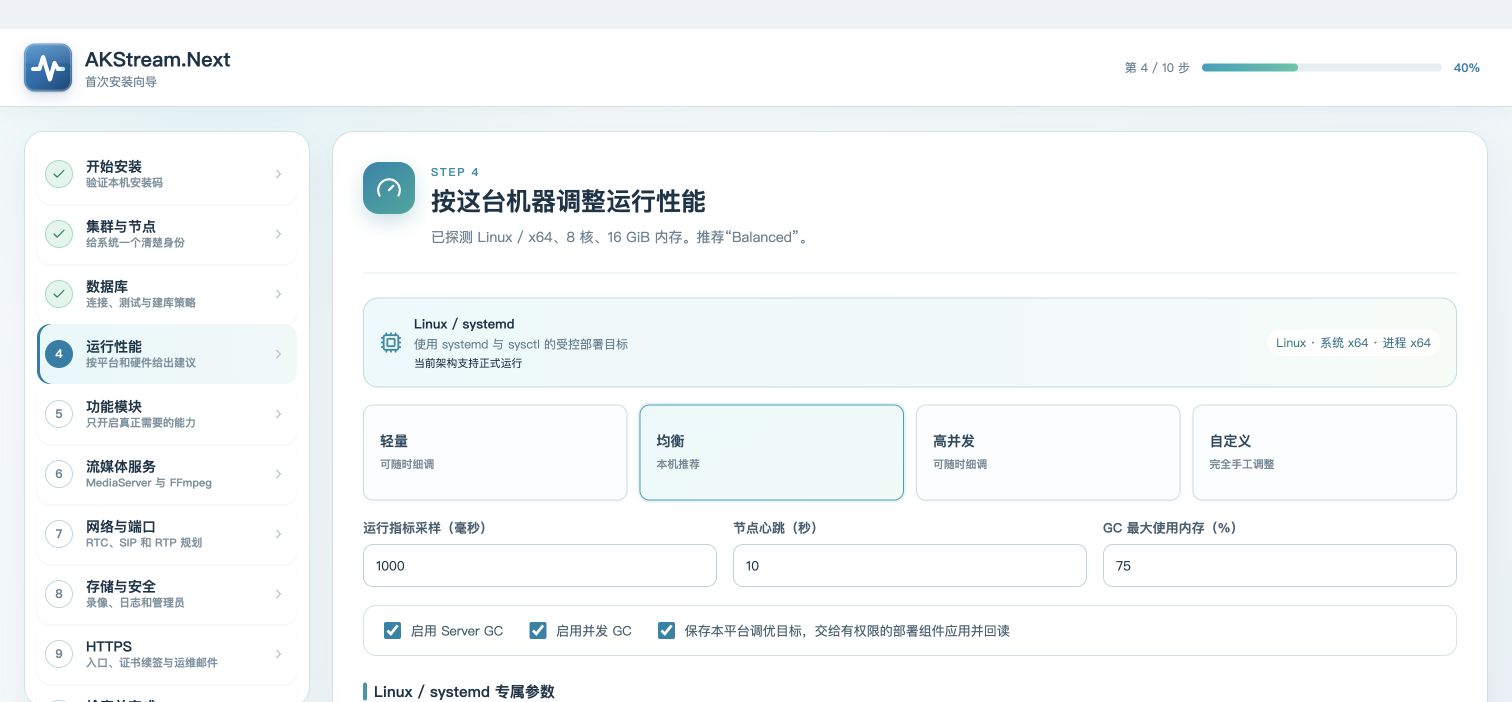
| Reading order | What to check or choose | Recommendation and meaning |
|---|---|---|
| 1 | Detected OS, architecture, CPU, and memory | If they do not match the real server, return to step 1 and check the target instance |
| 2 | Small, Balanced, High throughput, or Custom | For a first installation, use the profile marked Recommended for this host |
| 3 | Sampling, heartbeat, and GC memory limit | The profile fills these values; do not change them without measurement |
| 4 | Whether to save host-tuning targets | An authorized deployment component applies and reads them back; otherwise they remain external actions |
Completion check
A specific profile is selected, hardware facts are correct, and the GC memory limit is reasonable. New users normally leave Advanced intervals collapsed.
If you cannot continue
- Do not select High throughput on a low-memory server.
- In containers, check container memory limits in addition to total host memory.
- A host-tuning failure must remain visible as an external action, not be reported as success.
Step 5: enable only the modules needed now
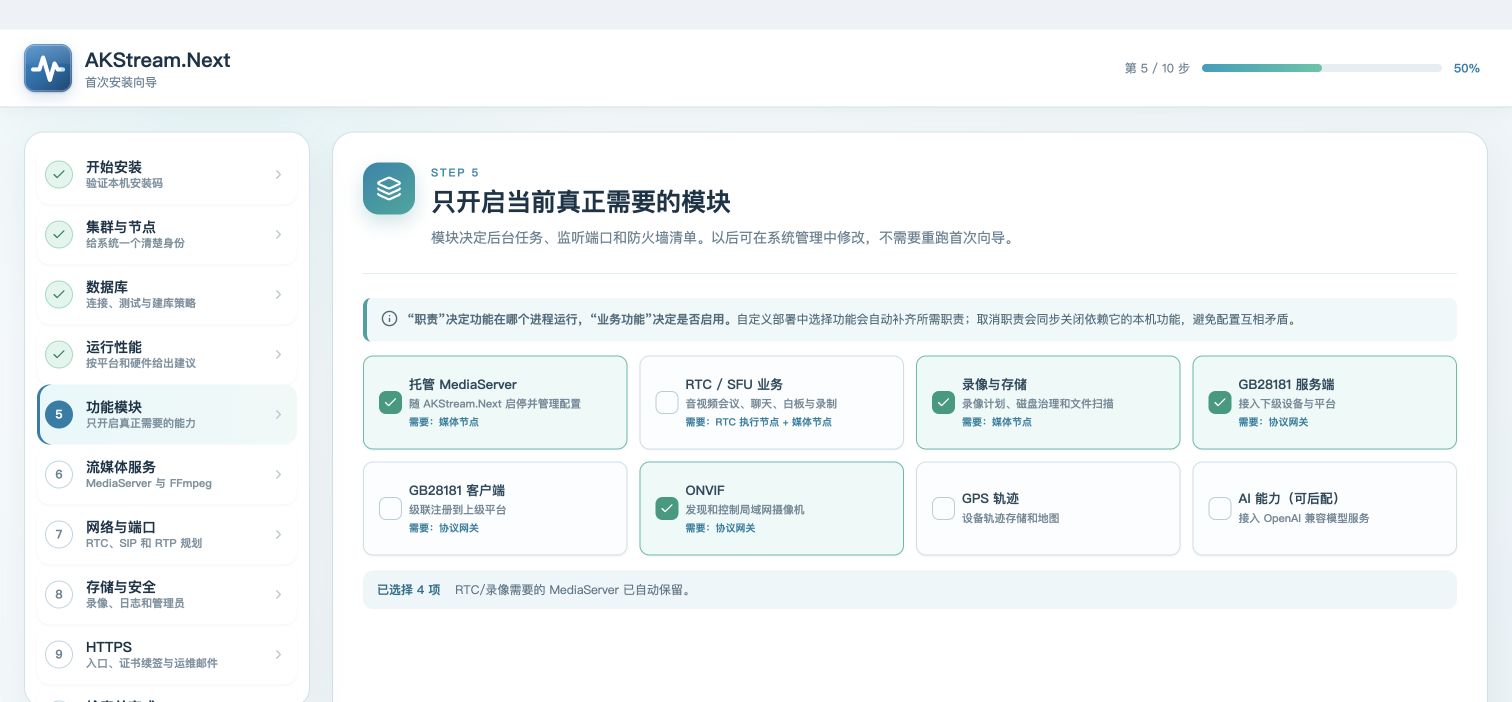
| Reading order | What to choose | When to enable it |
|---|---|---|
| 1 | Managed MediaServer | Enable for all-in-one and media nodes; control-only can disable it |
| 2 | Recording and storage | Enable for platform-local recording; step 8 then requires a recording root |
| 3 | GB28181 server/client and ONVIF | Enable only protocols that the deployment really uses |
| 4 | RTC, AI, and GPS | Leave disabled without a current requirement; they can be configured later |
Completion check
The selected-module summary matches project scope. Required process roles are filled automatically, with no feature enabled on a node that cannot execute it.
If you cannot continue
- GB28181 client is needed only when this platform registers to an upstream platform.
- Watching cameras does not by itself require RTC.
- AI endpoint and API key can be configured after installation and should not block the basic video platform.
When enabling Recording semantic search, select Chinese-CLIP RN50, ViT-B/16 or SigLIP2 and an inference backend. The wizard also keeps recording and managed MediaServer enabled; activate the module license after installation. In step 8, the Qdrant directory defaults beneath the first recording root, or use the server directory picker to select persistent storage. See Recording semantic search for model spaces and backends.
Step 6: validate MediaServer and FFmpeg
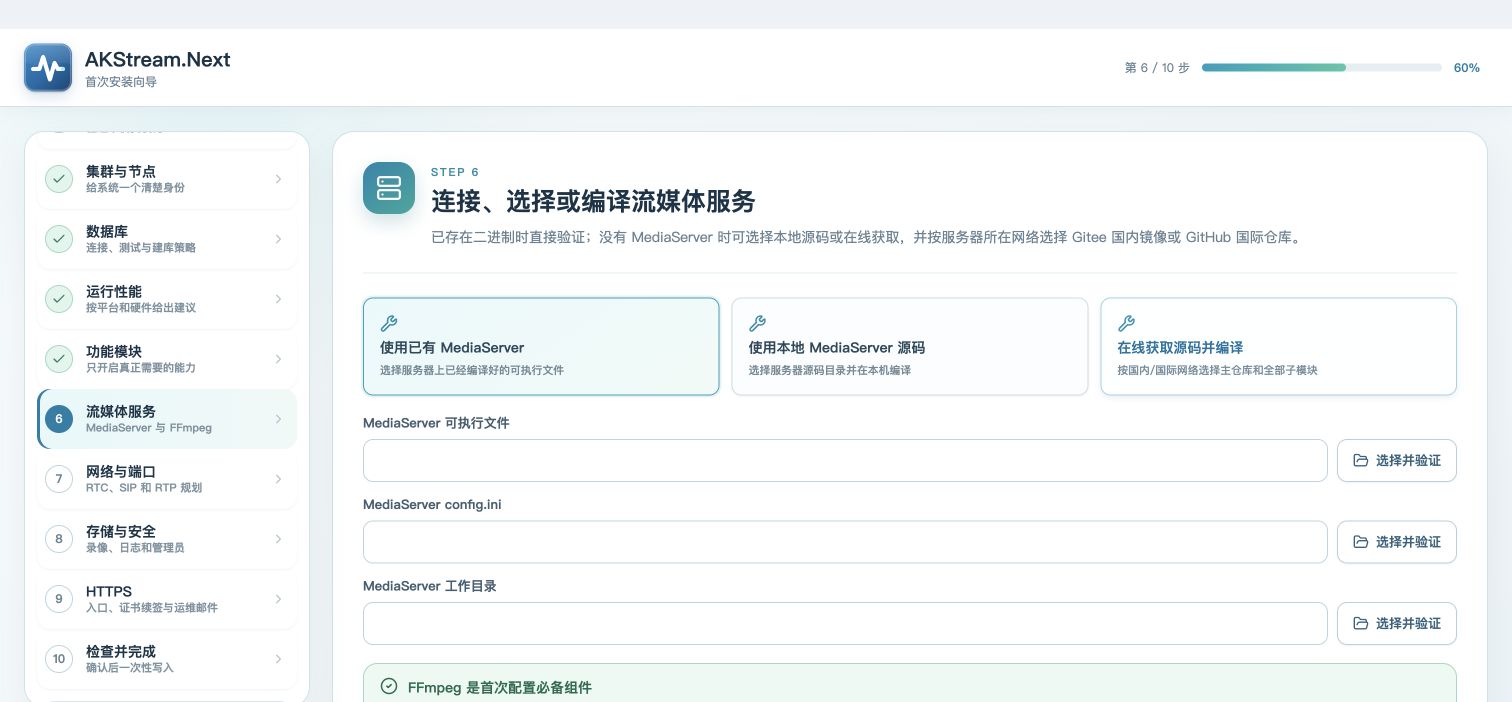
| Reading order | What to enter or choose | Recommendation and meaning |
|---|---|---|
| 1 | Existing MediaServer, local source, or online build | Prefer validating a packaged executable when available |
| 2 | MediaServer executable, config.ini, and work directory |
Use Select and validate; these are server paths, not browser-computer paths |
| 3 | FFmpeg executable | It must validate; /usr/bin/ffmpeg is a common Linux path |
| 4 | MediaServer API URL and secret | Local deployments often use http://127.0.0.1:18080; leave secret blank to generate a strong value |
Completion check
MediaServer, config.ini, and FFmpeg all validate, and the API URL is reachable. For a build mode, wait until the job succeeds and output paths are filled automatically.
If you cannot continue
- Path not found: reopen the server path picker; do not guess the location.
- Missing build dependencies: run the platform-specific command shown by the page and probe again.
- Download fails in mainland China: use the Gitee mirror; use GitHub for suitable international networks.
- Navigation is intentionally locked while MediaServer is compiling so half-complete paths cannot be saved.
Step 7: enter public addresses and ports
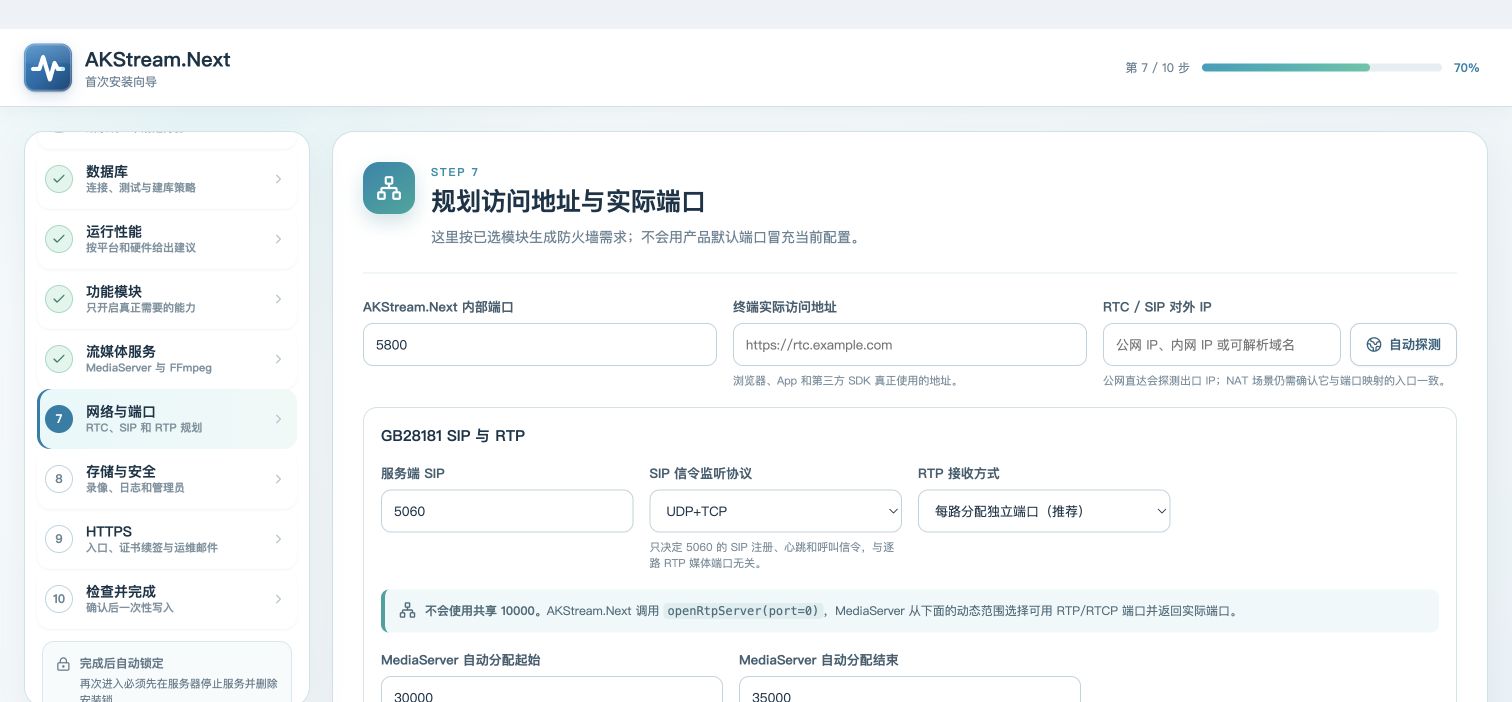
| Reading order | What to enter | Recommendation and meaning |
|---|---|---|
| 1 | Internal HTTP port and real client URL | Browsers, apps, and SDKs use the client URL, normally an HTTPS domain behind a proxy |
| 2 | RTC/SIP external IP | Auto-detection helps, but NAT deployments must match the actual mapped entry |
| 3 | RTC, ICE, and TURN ports | Needed only for RTC; TURN is a range, not one port |
| 4 | SIP port and RTP ingress mode | Prefer a per-stream port for ordinary deployments; fixed 10000 requires known device and SSRC compatibility |
Completion check
The client URL works from the real user network, the external IP is reachable by devices/browsers, and no port ranges overlap. Step 10 generates the firewall list from these exact values.
If you cannot continue
- A working Web page does not prove RTP, RTC, or TURN ports are open.
- Across NAT, never enter
127.0.0.1or a container-only address. - Fixed 10000 is not simply fewer firewall ports. Keep per-stream dynamic mode when device compatibility is unknown.
Step 8: configure recording, logs, and administrator
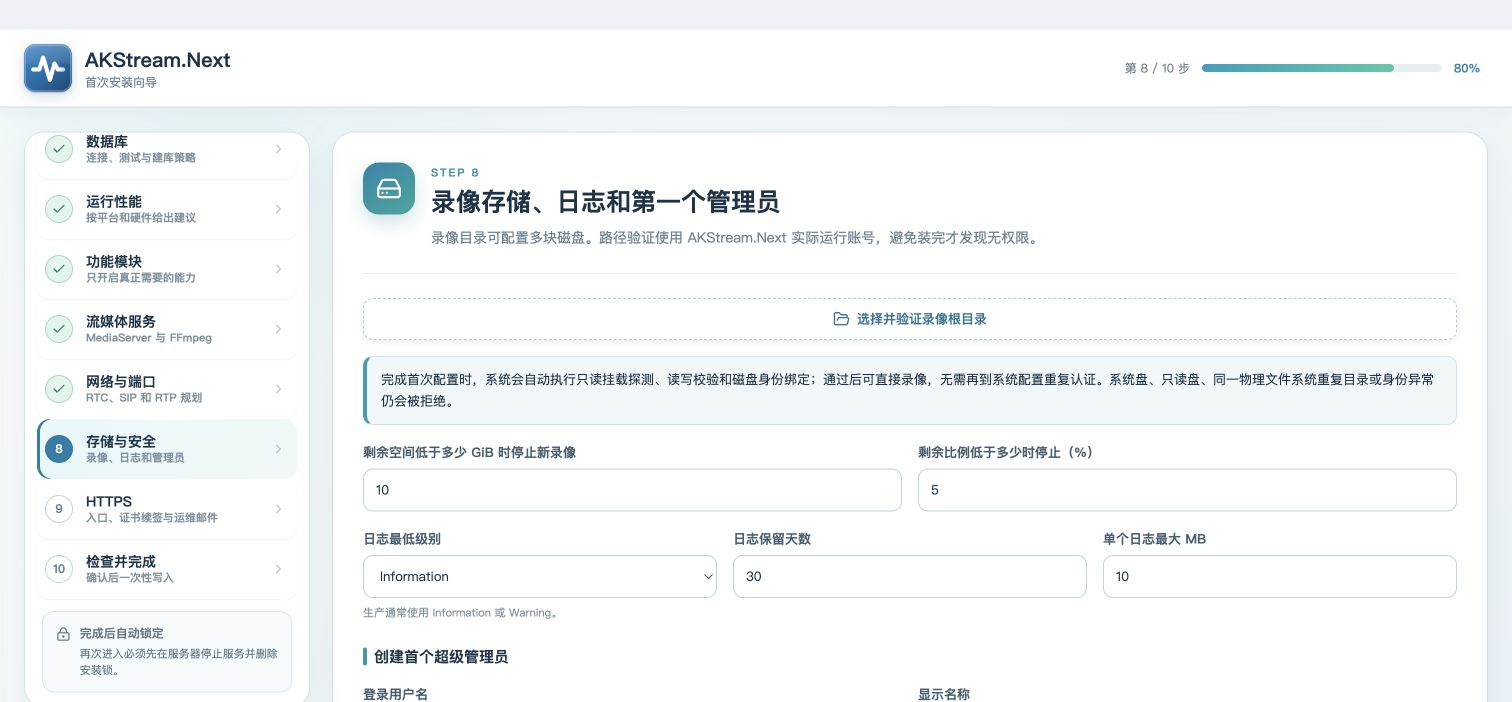
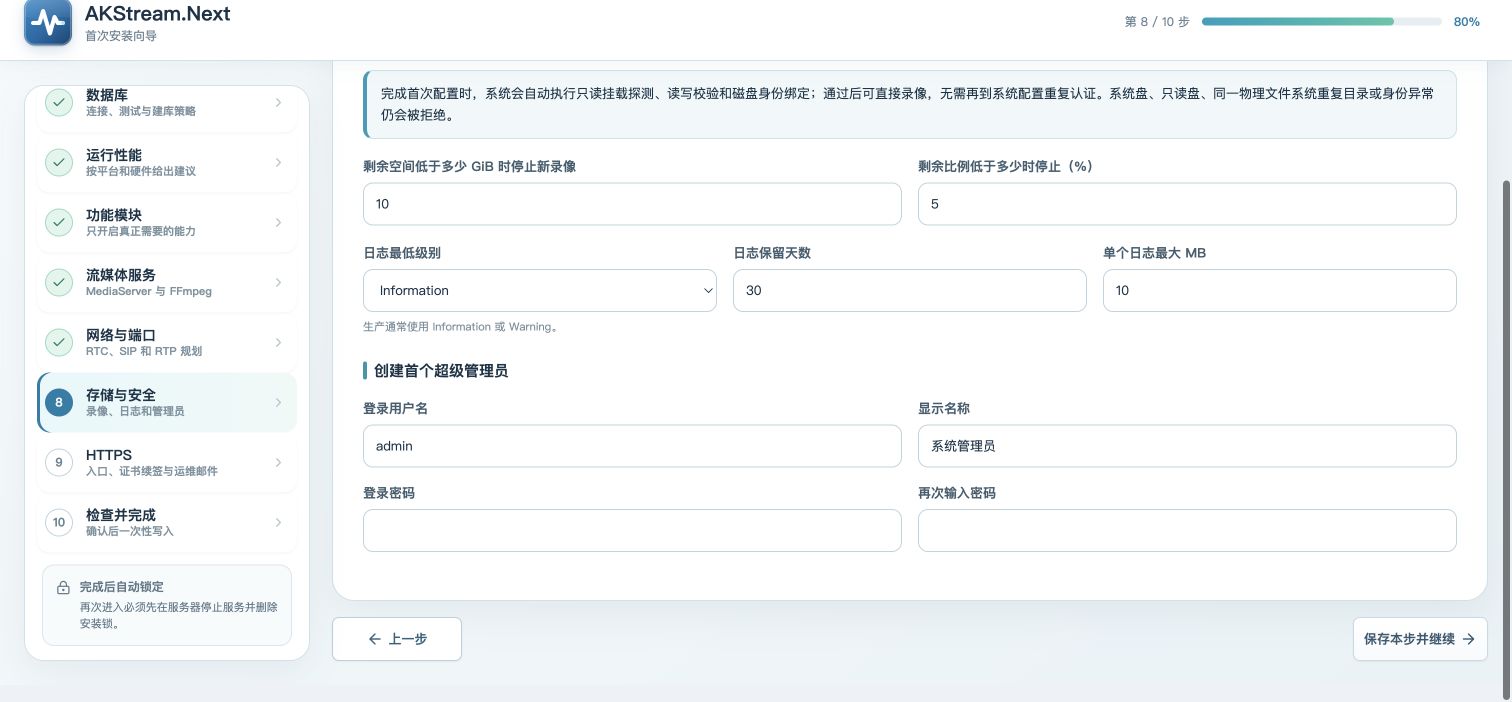
| Reading order | What to enter | Recommendation and meaning |
|---|---|---|
| 1 | Select and validate a recording root | Use a dedicated data disk; the system checks mounts, permissions, writes, and disk identity |
| 2 | Low-space protection | Example: stop new recordings below 10 GiB or 5% |
| 3 | Log level, retention days, and file size | Production normally uses Information or Warning with explicit retention |
| 4 | First admin username, display name, and password twice | Both passwords must match; do not reuse database, device, or MediaServer passwords |
Completion check
When recording is enabled, at least one root validates and thresholds protect the system disk. Administrator fields are present and both passwords match. No recording root is required when recording is disabled.
If you cannot continue
- Recording root rejected: check system disk, read-only mount, duplicate physical disk, and runtime-account permissions.
- Administrator password mismatch: enter both values exactly and avoid leading/trailing copied whitespace.
- Longer log retention is not always better; match disk capacity and audit policy.
Step 9: choose HTTPS entry and certificate
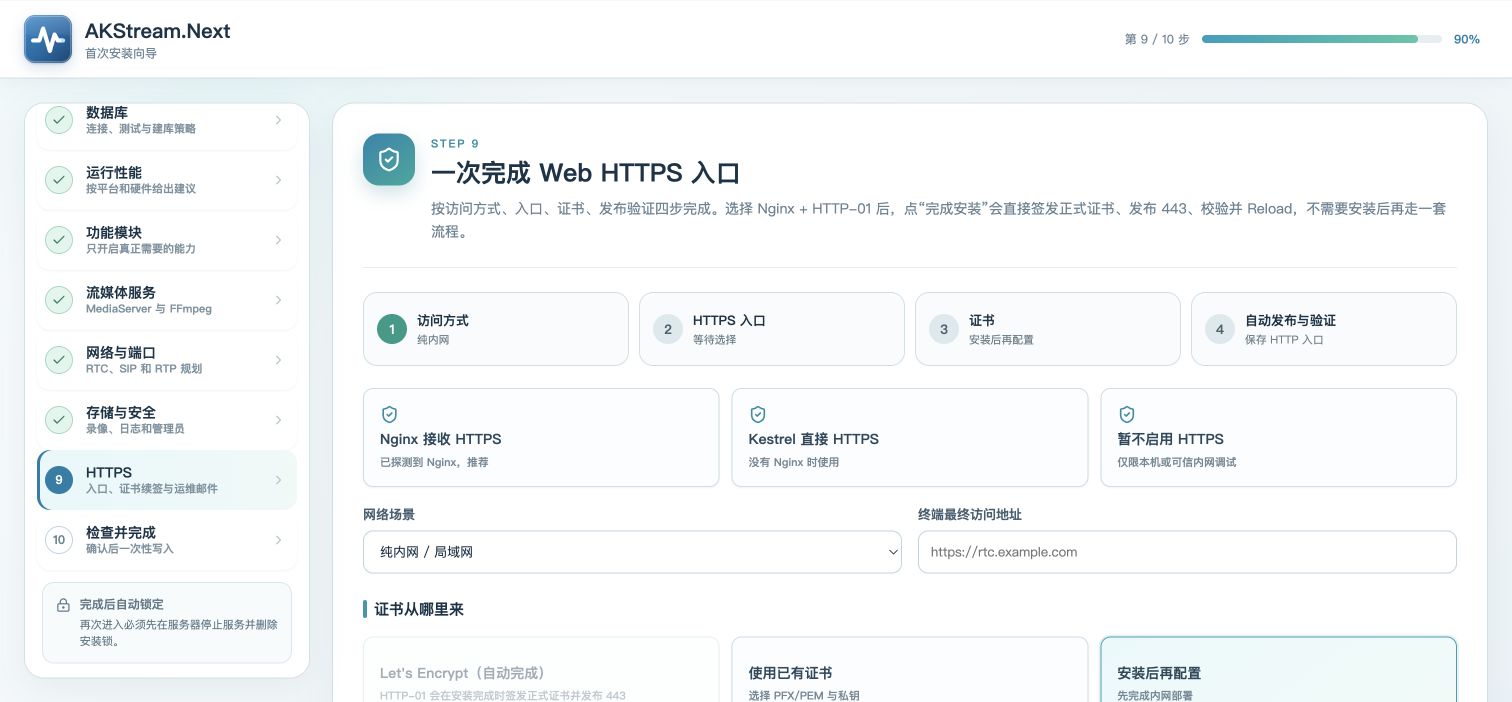
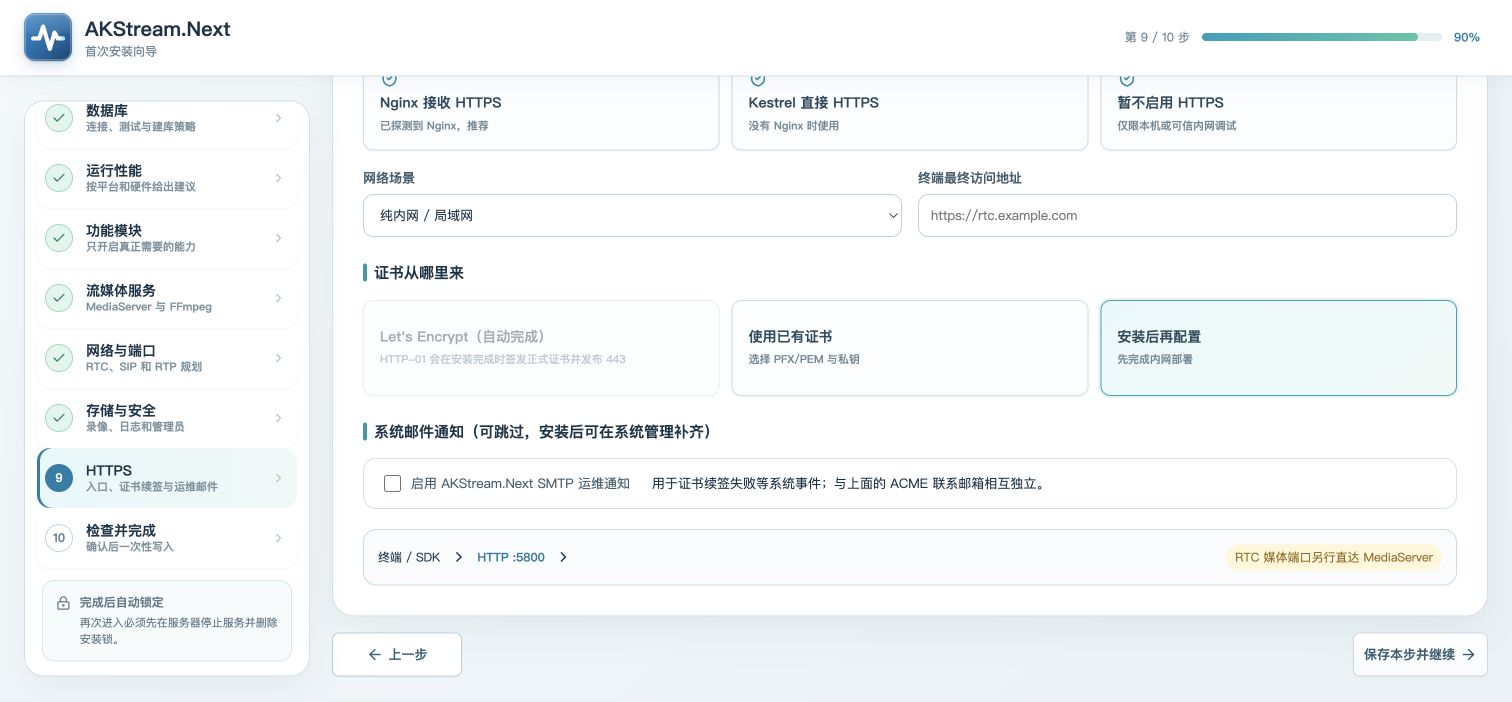
| Reading order | What to choose or enter | Recommendation and meaning |
|---|---|---|
| 1 | Network scenario and final client URL | Choose intranet, direct public domain, or NAT mapping; the URL must match the real entry |
| 2 | Nginx, Kestrel, or no HTTPS | Production normally terminates 443 at Nginx; disabled is only for local or trusted-intranet testing |
| 3 | Let's Encrypt, existing certificate, or configure later | HTTP-01 requires correct DNS and public port 80 reaching this entry |
| 4 | Probe Nginx again and optionally configure SMTP | Nginx mode performs nginx -t, reload, and HTTPS checks; email is optional |
Completion check
A public deployment has a domain, external IP, HTTPS entry, and certificate source. An intranet deployment still has an explicit access boundary. The running Nginx process, configuration, and site include have been identified.
If you cannot continue
- Let's Encrypt unavailable: choose Nginx HTTPS entry first.
- HTTP-01 fails: check DNS, public port 80, firewall, and whether another site captures the challenge.
- Browser uses HTTPS but backend sees HTTP: the proxy must overwrite
X-Forwarded-Protocorrectly. - RTC media ports are not automatically solved by a 443 HTTP reverse proxy.
Step 10: run preflight and complete installation
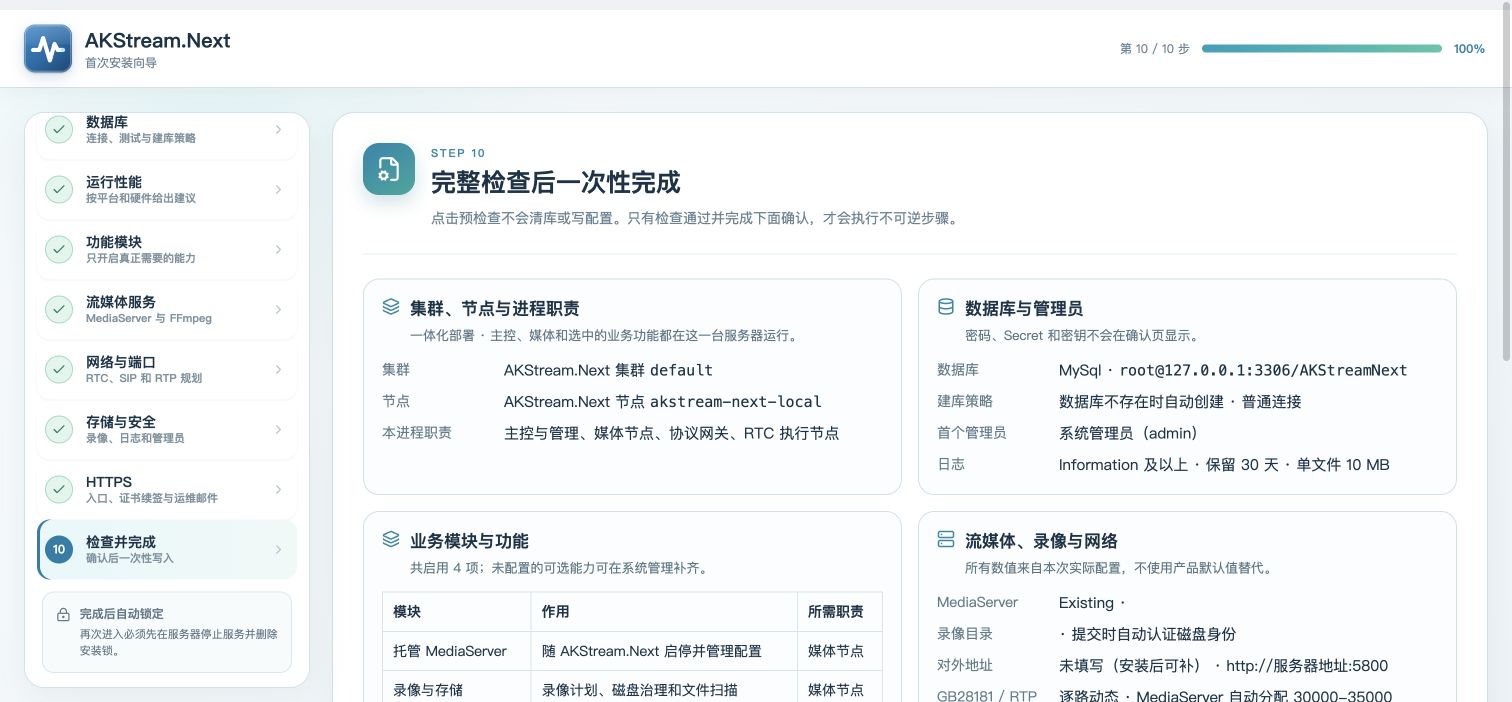
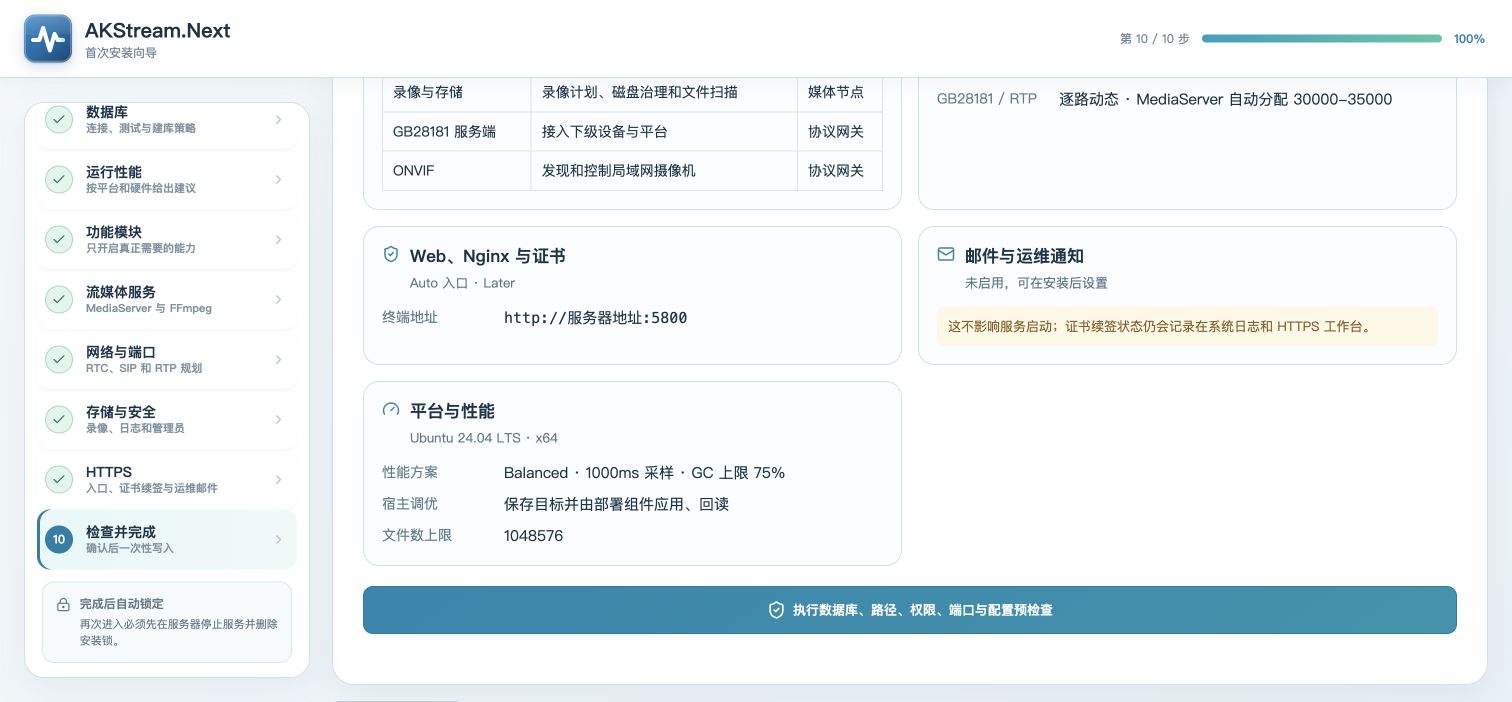
| Reading order | What to do | Correct result |
|---|---|---|
| 1 | Review cluster, database, modules, media, network, storage, and HTTPS summaries | Values match the first nine steps; passwords, secrets, and keys are not displayed |
| 2 | Select Run database, path, permission, port, and configuration preflight | Red blockers are zero; yellow advisories require review but may not block installation |
| 3 | Review firewall/security-group entries | Understand each port, protocol, source network, and purpose; open only what is needed |
| 4 | Select final confirmation and Complete installation and start AKStream.Next | The page enters installation/restart and finally redirects to sign-in |
Completion check
Preflight is green with zero blockers and final confirmation is selected. After submission, wait for database initialization, configuration writes, Nginx/certificate work, and restart. Do not submit twice.
If you cannot continue
- Red error: return to the named step, correct it, and rerun the full preflight.
- Automatic port adjustment: verify adjusted values are acceptable to devices and firewall rules; the final list uses adjusted ports.
- Connection closes during submit: service restart can interrupt the request. Let the page continue health checks instead of submitting again.
- Reconfiguration also requires an explicit database-business-data reset confirmation; it is not an ordinary setting change.
Check immediately after setup
- When the sign-in page appears, use the administrator created in step 8.
- Confirm that node and MediaServer status are healthy and version matches the package.
- Open the client URL from the real user network and confirm HTTPS has no certificate or mixed-content error.
- Follow Connect the first video to preview one real device or RTSP source.
- If recording is enabled, make one manual recording and find a playable file in Recording Center.
Reconfiguration is not ordinary editing
After go-live, change ports, recording, modules, or HTTPS from the corresponding System management page. Enter reconfiguration only when initial setup must run again and business data will be rebuilt.
Final confirmation in reconfiguration clears AKStream.Next business data in the database. Physical recording files can remain and be rescanned. Back up the database, Config, signing material, and required files first.
Next
- Service not installed: read Choose an installation method.
- Wizard complete: Connect the first video.
- Going to production: complete Six security settings before go-live.