Connect an ONVIF camera
After ONVIF onboarding, the camera appears under Asset details, main and sub streams become separate channels, and the page shows only controls the device actually supports.
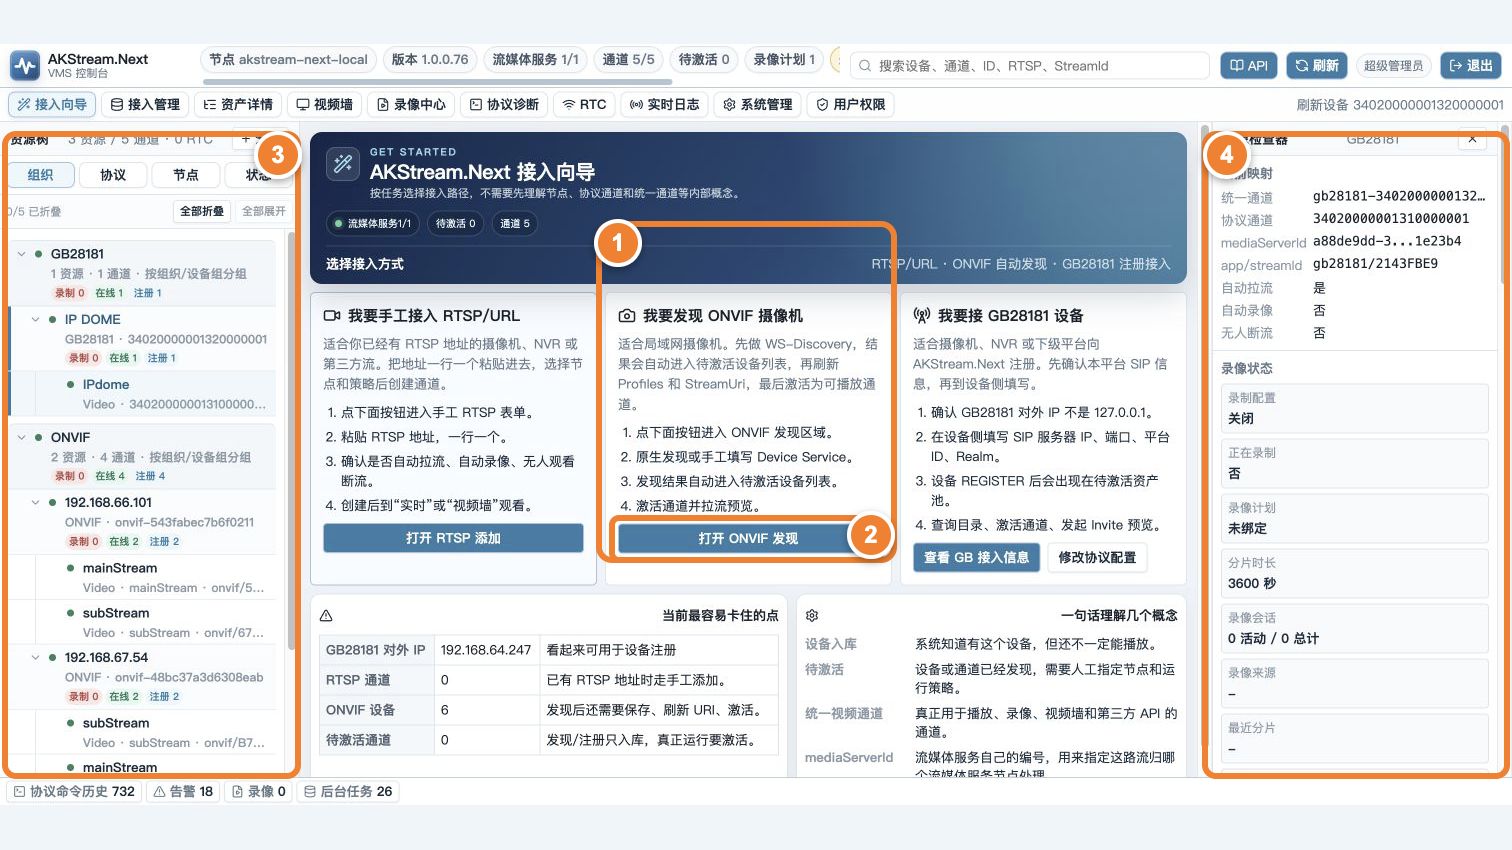
Follow the numbers: ① choose ONVIF discovery; ② run discovery and verify the device account; ③ inspect main and sub streams in the resource tree; ④ select a channel and verify its Profile, media node, and stream identity in the inspector.
Before you start
- Enable ONVIF on the camera webpage.
- Create a dedicated ONVIF user; do not assume the webpage account works.
- Synchronize camera time, timezone, and NTP.
- Confirm the AKStream.Next server can reach the camera ONVIF HTTP/HTTPS and RTSP ports.
Onboarding route
flowchart LR
    A["Search or enter device address"] --> B["Verify ONVIF account"]
    B --> C["Read Services and Capabilities"]
    C --> D["Read Profiles and StreamUri"]
    D --> E["Create channels and add to Asset details"]
    E --> F["Preview the main stream"]
Step 1: find the device
- Open Onboarding → ONVIF device.
- When camera and server share a LAN, search first.
- If search finds nothing, enter the device IP or XAddr manually.
- Check IP, port, and vendor in the result to avoid selecting the wrong device.
WS-Discovery is not reliable across VLANs, VPNs, or routers. Across networks, entering the address is more reliable than repeated search.
Step 2: enter the account and complete onboarding
- Enter the ONVIF username and password.
- Select Complete onboarding and add to assets.
- Watch the steps: authentication → Services → Capabilities → Profiles → StreamUri → channel creation.
- When a step fails, expand its details and fix that layer instead of creating the device again.
“ONVIF account saved” is not complete. At least one Profile must create a channel and enter Asset details.
Step 3: verify the main stream
- Open Asset details and select the new device.
- Check Profile count and names and distinguish main and sub streams.
- Select the main-stream channel and open preview.
- Play for 5 minutes, close it, and open it again.
A Profile is one set of media parameters provided by the camera. Multiple Profiles on one device are normal and are not duplicate devices.
PTZ, image settings, and events
After onboarding, the page shows functions according to Capabilities:
- PTZ: move, zoom, and presets;
- Imaging: brightness, contrast, exposure, white balance, and focus;
- Events: PullPoint subscription and renewal;
- DeviceIO/Talk: relay, input/output, or audio talk.
A missing button usually means the device did not report the capability. If a visible button fails, inspect the SOAP Fault and account permission.
Common failures
| Symptom | Check |
|---|---|
| Search finds nothing | NIC, VLAN, multicast, and firewall; enter IP/XAddr when needed |
| 401 or authentication failed | Dedicated ONVIF account, password, lock state, and device time |
| Device information exists but no Profile | Media service, Media1/Media2 support, and account permission |
| Profile exists but preview fails | StreamUri, RTSP TCP/UDP, codec, media node, and credentials |
| Repeated sync creates duplicate channels | Stable Profile token and whether multiple device records were created |
Success criteria
- Device information, Services, Capabilities, and Profiles can be read.
- Repeated synchronization maps the same Profile token to the same channel.
- At least one channel plays continuously in the browser.
- Required PTZ, image settings, or events work on the real device.
- Pages and logs do not display the device password.
Before batch onboarding, record target model, firmware, successful Profiles, and unsupported capabilities.